Showing posts with label apartment challenge. Show all posts

Thursday, June 27, 2013

Apartment Challenge :: An Early Finish


A while back I started a (sporadic) little series, posting about projects I was taking on in my own apartment to spruce it up a bit.  Well, as these things happen, we ended up moving out before I completed all of the projects I'd had in mind - though really, a home should be a reflection of your life, and as such it is always a work in progress!  Here I'm sharing the final photos of our place as it was just before we moved.  


You can probably see that I did replace the sofa legs (read part one of that project here), a minor detail that to me makes a huge difference.  There were lots of little things that I never got around to, like rehanging curtains or doing anything to jazz up the dining area, and I did diddly in the bedroom/office.  But we'll always remember that place fondly.  We were happy and comfortable there for 2.5 super transformative years.  In moving, one of the most amazing things was seeing just how much we had fit into a rather small one-bedroom apartment.  By living an edited life and making sure that every inch of closet and storage space was organized and used in the most efficient way possible, we were able to keep visible areas and surfaces pretty clutter-free and comfortable.  Once spread out, all of our "stuff" managed to fill our new, much larger place with no problem.  

Stay tuned for future photos of our new place!

Saturday, April 13, 2013

Apartment Challenge :: Artwork Hanging :: part 2


Finally!  I am posting some pics of the re-hung artwork.  I actually hung it long ago, but have been very busy and slacking on the blog.  In my first post about this project I showed a few images of some great looking artwork walls to serve as inspiration.  Since I was working with the artwork we already have, I knew I needed a way to make the pieces relate to each other.  I realized that I already had lots of black frames, and so decided that swapping out the few non-black frames for black would be a simple way to create continuity.  Overall, it's a big improvement!

One tool I bought to make things easier was the Hang & Level by Under the Roof Decorating.  It's a bargain at under $15 (available here on Amazon) and makes marking the wall where the hanging hardware needs to go a total snap.   And if you've just been using nails to hang your artwork, stop it right now!   You can get a picture hanging kit at a local hardware store (or on good old Amazon) and stop tearing up your walls and know that your artwork is more safely fastened to the wall.


Friday, February 8, 2013

Apartment Challenge :: Artwork Hanging :: Part 1


You might remember this sad photo that showing the pathetic state of the "artwork gallery" behind our sofa.  There used to be a fourth piece hanging there, but I knocked into it and broke the glass so it had been down for the count for a few months.  But even while that was up, there were some issues:  the artwork was hung too high, and the layout of the four pieces just wasn't working.  Needs more filling out.  Plus Annie Oakley is in a rather crooked frame that my husband and I made ourselves in the early days of our relationship.  I will keep the frame for memory's sake, but I think I will re-frame Annie for now.  

So, finally, I am finding my motivation and will fix this wall!  To get inspired I've gathered some photos of successful gallery walls to share...


Wowzers.  This one is like an explosion - a puzzle of artwork.  And how beautiful is that crown molding?  It is like the mother of all crown moldings.  Where do people find these apartments?  Anyway - drawings, paintings, prints, three dimensional works, photography are all on this wall.  The frames are all different but it all works because there is just SO much of it.  And it might seem haphazard at first, but if you pay attention you can see there was thought put into the way certain pieces would line up with each other.  I definitely don't have this many pieces to put up, but I am inspired by the way they fit their artwork together.  Image via littlebluedeer.com.

Here is a similar wall, below.  Image via theapartment.dk


First off, I would kill for ceilings this high.  The gallery wall stretches all the way from the top of the sofa back to just below the ceiling for a huge impact.  The pieces aren't strictly gridded but again there is a method to how their positions relate to one another.  And the fact that they are all similar works with a simple color palette and matching frames keeps this gallery wall feeling a little more buttoned-up than the previous two.  The concept here is really similar to what I did for my entry wall.  Image via Elle Decor.


Well isn't this cute?  So smart the way the designer hung the artwork to mimic the shape of the bed canopy frames.  All of the works have a similar color palette and theme, and the frames all match too.  I won't be working with the outlines of a canopy bed, but this photo is a good reminder that if you can take cues from some other feature of your interior when deciding how to arrange your artwork, it can make for a nice little moment in your space.  Design by Amelia Handegan.


Lastly we have this lovely little baby artwork gallery by Workstead, a firm in Brooklyn who does gorgeous work.  It's a little more loose than the other gallery walls I've shown here, but it all ties together because the artwork and frames are similar in appearance and size and attention has been paid to how the pieces are placed in relation to one another.  Love the variation in the width of the frames.  Who can resist a tiny little artwork in a big chunky frame?

Ok, so you've seen my inspirations!  Stay tuned to find out how my own gallery wall turns out!

Monday, January 14, 2013

Apartment Challenge :: Replacing Sofa Legs :: part 1

Our sofa with its current wood block legs

I decided to jump on this project now, since it should be an easy one to tackle.  I am going to change out our sofa legs because I am tired of the standard wood block Ikea legs.  I want something a bit more sophisticated, and am planning on a tapered, midcentury-style leg, about the same height as the existing ones, and in a darker wood tone so that they stand out less visually.  Please kindly ignore the artwork hanging situation in the above photo.  That is my next project.

I found this helpful and inspiring article on the blog Honey Badger Home.  Love the name of the blog, and love the honey badger.  They went a step further than just replacing the legs and tufted the cushions for an even more midcentury look.  I am cool with the untufted cushions though.  Ours are getting pretty slouchy from over two years of use, but I like it that way.  Nice and casual.

Anyway.  I didn't really want to mess with Home Depot (have you been to an urban Home Depot?) and tools and metric/english conversions, so I just kept looking and looking and eventually found Uncle Bob's Workshop, who makes sofa legs that are explicitly billed as replacements for the Ikea Karlstad sofa.  You can order them in a variety of woods and finishes (or unfinished), and even with brass feet.  Here are some pics from their website:

A sofa with Uncle Bob's Workshop replacement sofa legs
A shot of just the sofa legs

I went ahead and ordered twelve replacement walnut legs for our sofa and ottoman and cannot wait for them to arrive.  Since I am picky about things, I emailed first to see how to get a matte finish (I'm thinking a glossy finish will reflect more light and draw more attention to the legs, plus I just personally prefer wood that has a more natural looking finish) and also to see if I can have them sent without the white protective pads on the bottom.  I plan to add my own, slightly smaller, black felt pads so that they won't be visible.  Uncle Bob emailed me back almost immediately with answers that were helpful, which was excellent.

I may try taping and dipping the feet in a gold metallic paint to get the brass feet look, or I might just leave them as is.  We shall see.  Check back soon for pics that show the replacement legs!

On a separate but somewhat related note, I sometimes am looking around at beautiful furniture and wanting to splurge on a really gorgeous sofa (or custom design one), but then something like this happens and I realize that this old Ikea thang with its washable, zip-off covers is really just perfect for us:

Oopsy! Did I do that?

Monday, January 7, 2013

Apartment Challenge :: Audubon Print Gallery


About a year ago, I received this lovely set of Audubon prints as a graduation gift from a good friend.  I love birds and I love nature illustrations, so I was super happy to receive these prints.  They sat around for a while, and finally I decided that it was time to do something with them!

You might remember my goals for our entry wall from my previous apartment challenge post.  We had a blank wall that needed some love.  So I got to it.

I started by spreading out all of the prints and deciding which ones would work the best in a cluster in that area.  I initially thought I might go with some of the more colorful prints, like this one:

Roseate Spoonbill, John James Audubon
but I just wasn't feeling it.  I know I tend to get tired of colors quickly, so I wound up selecting six prints with more muted coloring and lots of blue-gray, which works really well with the color of my walls.  Once I had my selections I played with taping them up on the wall to see how I wanted to lay them out:

L: Two of the prints I chose to display; R: Mock-up of the layout

I kept the prints that were fully colored in at the bottom, and used the two with white sky backgrounds at the top, so it feels like it gets lighter as it goes up.  The placement of the buzzer phone and light switch also helped to dictate the layout.  The bottom of the gallery is about 32" off the ground to allow space for a small accent table that we use to drop keys, pocket change, gloves, hats, etc.

Next I needed to decide how I was going to frame these puppies.  Budget was a consideration, so I knew I would probably be working with Ikea.  Since the images themselves are muted and not in too great a contrast with my walls, I opted for a darker frame to help set the prints apart from the walls.  I chose to go with an Ikea Ribba frame in medium brown.  These frames do come with mats, which is a plus, however my artwork wasn't standard photo size and I wanted to add a special detail element to the framing, so I didn't use the mats.  Instead I visited Grayline Fabrics in Midtown, which has a pretty wide selection of linens.  Printed, solid, and varying weights.  I selected a linen (Warsa Oatmeal, I think) to use in the frames behind each print.  

L: Linen for behind the prints; R: Wrapped backboard, Coco helped.
I wanted to add fabric to the framing to give the whole thing a bit more luxury and oomph, but opted for linen because it still looks and feels very natural/casual and just always appeals to me.  I thought about cutting mats and wrapping them with the linen, but I didn't want to get too fussy with this project.  I just wrapped each backboard in the linen and plopped it back into the frame with the print.  I trimmed the prints down a bit to show more of the linen and used a bit of rolled scotch tape between the print and the linen to keep the prints from sliding around.  Super simple.  You can see the frame clips a bit (see top picture), but I decided I was cool with that.  I like when you have a peek at how things work.

One of the framed prints
If you ignore the five hour trip to the emergency room that resulted from me cutting my finger and needing stitches (it healed, I'm fine, but do watch your fingers when you're cutting with a blade and straight edge, even if you've done it a million times before), this was a pretty easy, quick project.  Budget friendly too.  I think the cost of the frames and linen was probably about $80-$90 bucks for six prints, which comes out to about $14 per print.  And you could vary this in so many ways: spray painting/gold leafing the frames, wrapping mats in the fabric, using other types of fabric, etc.

Monday, December 3, 2012

Apartment Challenge :: What I'm Working With


So, here it is.  This is an overall "before" shot of the living/dining area.  It's been through a few different arrangements and incarnations, but this is what it looks like at the moment.  It's pretty bare because I've already taken down a bunch of artwork to prep for the revamp, but I'll show some photos of the "before befores" when I break down each zone.  See below for more photos with notes on some general goals.

Here's a shot of each side of the living area...
Everything in this living area is so low (and we are running out of shelf space for our growing book collection), so I think I want to bring the cubby bookshelves up two more rows on the left hand side.    They are these simple and great unfinished bookshelves from, you guessed it, and unfinished wood store in Rhode Island.  We keep getting more and more.  It makes sense for us, because we can break them up and reconfigure them in SO many ways to adapt to wherever we might live next.  And once I get my dream bookcase, these could be great secondary storage, to plop baskets in and use for kids' toys, laundry detergent, whatever.  To combat the clutter of our little trinkety things, I might experiment with shallow/ledge shelving painted the same color as the wall (like this).  I love all of our little collectible things because they are reminders of good memories, but right now they're all cluttered up on top of those bookshelves and it's just weird and messy.  The sofa is Ikea, and while there's nothing wrong with that, I think that by swapping out the legs for something more discreet and less blocky I can make it look a bit more refined.  I'll go with something tapered and in a darker finish.  Those storage cubes - also Ikea - are great and super functional (our apartment has only ONE closet, so we need to find ways to add storage wherever we can) but the perforated sides and tops let crumbs fall through and let you see all the junk we're hiding inside, so I want to add some fabric wrapped panels to solve those problems.  And then the artwork.  We've got a bunch of things that we like and have collected over time, but the frames are all different and I am tired of that look.  So I am going to find a way to unify the frames and then rehang all of the artwork over the sofa.

And now, shots of a wall just inside the entry door and the dining area...
I have a lovely set of Audubon bird prints that were a gift from a good friend that I want to frame (in matching frames) and hang up that small wall.  I can cover the phone jack, but the switch and awful telephone buzzer will be sticking around.  I might replace or refinish the little table on that wall.  It's where my husb drops his keys/wallet/pocket change/every business card he ever gets.  That piece there was something my mom found and gave to us, and while it has its charms, I think I'd like to graduate up to something nicer and that fills the wall a bit more.

The dining area is sooo bare right now, I know.  We used to have some of our artwork collaged above it.  I liked it, but we had all these artwork walls all over the place and it was so busy, so now I want to add something BIG there.  I think we can make a real moment out of this little dining space.  Ideally I'd love a gorgeous textile in a deep navy or charcoal, but since I have limited budget and limited patience for trolling ebay/craigslist, I think I may end up doing a diy here.  I'd rather splurge on some great lighting above the table and some nice linens.  Just ignore the chairs and table, I know they're not great.  Whatevs, they were cheapo.  Someday we'll upgrade and relegate these to a secondary room, but for now they're functional and not too ugly.

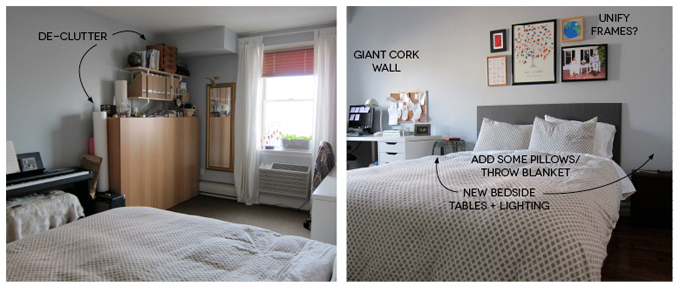
And a couple shots of the bedroom...
The bedroom has been re-shuffled SO many times.  It's always been half home office/half sleeping area (NOT ideal, I know), but it used to be more divided.  Now it's open.  Each arrangement has its pros and cons, but for now we are sticking with the open arrangement since it's much lighter and brighter.  We've already done a lot in here, but I still need some bed side tables, reading lights, some organization and a bit more storage, and then just some accessorizing for the bed.

So there you have it.  That's what I'm working with.  I plan to blog about each little project I take on and show inspiration research, progress photos, and final product as I go.  I'm also open to hearing any suggestions and ideas you have.  What would you do if this was your home?

Oh wait, one last photo.  This is the chunk muffin who lives here with us and has to approve of any changes.  

Friday, November 16, 2012

Apartment Challenge :: Inspirations :: part 5

Dining room by Pam Shamshiri of Commune, via House Beautiful.
Today will be my final post about the four elements that, in my opinion, make for a covetable interior.  This one is so important...personality!!!  You can spend all the money in the world on amazing furniture, fixtures, and finishes, but if your home doesn't say something about who you are, then it's just going to feel sterile.  These images show some great examples of spaces with character.  Lots of it.  The easiest way to show who you are is to display your stuff.  Photos, artwork, travel souvenirs, or other collections should be beautifully and proudly displayed.  They're also great conversation starters if you throw a dinner party for new friends.

Spoiler alert:  Displaying your things sounds so fun until you have to figure out the perfect way to do it...this is something I'll have to deal with.  I'm looking at it as an experiment.

Image via Living Etc magazine.

Home of Richard Lambertson and John Truex, via Architectural Digest.

Thursday, November 15, 2012

My Apartment Challenge :: Inspirations :: part 4

Home of Jenni Kayne, via Architectural Digest
This is my third post about the elements that, to me, make a successful interior.  The first two posts were about balance and natural materials, and this post will talk about contrast.  Whether it's a texture or material contrast (like in the photo below - matte vs. reflective / rough vs. smooth) or a value or color contrast as shown above (light flooring and furniture vs. dark walls), contrast is a super important part of a successful interior.  In my book, it's important not to be matchy.  That gets boring fast.  A variety of contrasting elements, and a variety of types of contrasts, will keep things interesting.  Take the coffee table shown above.  The base is a rough, very organic piece of wood, and the top is a very regular, smooth, reflective piece of glass.  Lovely.

Single Stem Vase by Heath Ceramics

Wednesday, November 14, 2012

My Apartment Challenge :: Inspirations :: part 3

Living room, via Living Etc. Magazine
The first element for a great interior that I discussed was balance.  Now we're moving on to the use of natural materials.  I love nature.  I live in the city so I don't see much of it out my windows.  That means I need to work to incorporate it into my life.  One way to do this is by filling my home with, you guessed it, natural materials.  Sisal, wood, plants (so important), stone, hides, wool, etc.  Beyond reminding me of nature, they also add GREAT texture, which helps with contrast (which we'll talk about later) and balance.  They just make a room feel more layered, interesting, and alive.

Look at the picture above.  They have a tree growing out of the floor in that living room.  That is pretty fantastic.  It's not really a possibility for most of us, but we can get potted plants and potted trees.  And you should.  A plant is basically a living sculpture.  Plus they help purify the air.  Don't have a green thumb?  You can find lists online of the easiest plants to care for.  Just try it.  I have plants that I've had for ten years.  They're like part of my family at this point.  ANYWAY...  In addition to that tree, they also have some nicely grained wood forming the frame of that fab navy velvet sofa (great contrast), and those pressed concrete walls.  Maybe it's a little extreme, but to me it all works and I would love a chance to explore that room.

And below we have another shot which shows a unique use of rope, another natural material.  Gives great texture.  Plus there's lots of wood, great views to lots of trees outsides, and cut flowers on the table.  I love that ceiling treatment.  Here on the excellent blog The Brick House, is another amazeballs use of rope.  I have such a crush on those rope walls.  Someday I will build some.

Home of Athena & Victor Calderone, via Elle Decor.
Now we move on to this last beauty.  The beautiful horizontal wood panelled wall treatment really anchors the room, and provides a nice contrast to the verticality that results from those high ceilings.  We have plants again, both inside and outside.  Natural fiber rug, fur pillows, rustic wood furniture, wool blankets, leather, concrete floors.  All of this makes for a really visually interesting room.  You don't have to go crazy with color to make a room really interesting.  Add on layers of different textures and there you have it.
Home of Mark Egerstrom, via House Beautiful.

Tuesday, November 13, 2012

My Apartment Challenge :: Inspirations :: part 2

Home of Jason Carroll, via An Afternoon With
In my last Apartment Challenge post I introduced my guidelines for what makes a compelling interior (a mon avis).  The first tenet is balance.  Here I want to show you some rooms that, to me, are gorgeously balanced.  This shot of the dining area of Jason Carroll (above left) is such a dramatic little moment.  All the warm buttery neutral tones would be lovely on their own, but that deep, giant, moody canvas in the background give the space a sense of depth that really takes it to the next level.  Without it, it would be "nice."  With it, it's FAB.

Balance is kind of the master requirement for a good interior.  A balanced room knows what it is.  The lighting is right, whether it's dark and moody or bright and sunny.  Each element serves to support the function and vibe of the room.  Everything is where it should be and you know immediately that you want to go into that room.  

Here are two more examples.  They are both bedrooms.  Maybe it's because I am cold right now and I want to be under a ton of warm blankets.  Regardless, the rooms are gorge.

Home of Athena and Victor Calderone via Elle Decor.
Don't you just want to crawl into that bed with a book for a lazy weekend afternoon?  The palette in this room is so soft and light, with just enough points of darkness to balance everything out.  It's not overly busy but still has character and personality.  The rough, rustic wood pieces are balanced by layers of softness (rug, bedding, blankets, pillows, window treatments).  So peaceful.  Balance, balance, balance.

Attic room from the project Glamorous Four Square by Jessica Helgerson Interior Design.
Whoa whoa whoa.  Another bed I want to jump into and occupy.  This room feels like a fort.  The contrast between the rustic wood walls/ceiling and that chandelier is brilliant.  Keeping the floors and furnishings light and white counters the yellow/orange wood everywhere else.  The nook and cranny bookshelves add to the personality of the space.  Great balance here as well.

Up tomorrow: use of natural materials


Monday, November 12, 2012

My Apartment Challenge :: Inspirations :: part 1

Home of Frank Muytjens via Elle Decor
In my first post about my Apartment Challenge I mentioned that I feel I've reached a point where I know what I like immediately when I see it.  I really believe that if you need to think hard about whether you like something, then you probably don't like it.  Go with your gut.  Basically I either feel like "I want to be in that room" or "meh" or "that room gives me hives."  My opinion, of course, is only my opinion, and just because something isn't my jam, doesn't mean it's not a good design.  And just because I lurve something doesn't mean that everyone else will.  But I hope you do.

As part of my planning for this challenge, I've rounded up some of my favorite interiors and analyzed them to develop a sort of interior design rubric/set of guidelines to help explain what it is that I love about these interiors so much, and hence, what is important to me in a design.

Read about these guidelines after the jump...

Wednesday, November 7, 2012

Apartment Challenge :: Framework & Goals

Last week I posted about my challenge for myself: to make my own home into something portfolio worthy.  After thinking about it a bit, I've developed the general framework and goals below.

Framework
  • Flexibility - As it's a rental, we must be sure to employ solutions that can be easily adapted to work in future homes.
  • Budget Sensitivity - I'm not rolling in it, and can think of better uses for money at this stage in my life, so my design solutions need to be friendly on the wallet. Which means I'm gonna have to make up for the lack of dough with lots of elbow grease and time. 
  • Serenity, warmth, personality - That our home feels welcoming and serene is the most important thing to my husband and myself.  To me that means there's no clutter, but there is a place for everything that's important to us. Everything works together to make one clear statement and showcase those things. 
Goals
  • In general, make our home feel a bit more grown-up/less "Ikea." 
  • Maintain a serene and uncluttered look in the home while showcasing our collections. 
  • Develop adjacent living and dining areas to serve as a more upscale feeling backdrop to showcase our assorted artwork, travel souvenirs, and book collection. Differentiate these areas somehow, but ensure that everything works together in a cohesive way. 
  • Transform sleeping area into a more grown-up, serene environment. 
Check back soon to see find out what exactly I'm working with.  To give you an idea of the starting point of the challenge I'll include the "before" shots of our home as well as an idea of what sorts of things we have that we want to showcase.

Monday, November 5, 2012

Apartment Challenge


As an interior designer just starting my own business and working to build a portfolio, I realized recently that not having lovely, styled photos of my own home is a huge missed opportunity.  This is really the only place I can do exactly what I want, interior-wise.  To be honest, the main reason I don't have my own place in my portfolio is because there's really nothing special about it.  When we moved in we needed to furnish our whole apartment - quickly and cheaply.  So it sort of looks like an Ikea catalog.

Don't get me wrong, I really love my home (and I admit that I have a soft spot for Ikea).  We're comfy here, but in terms of decor I think it's a case of the dentist's kids having no teeth or the emperor's children having no clothes, whatever.  Plus, when we moved in I hadn't had any interior design education yet, so I was just throwing things together without a sort of overarching framework or concept.

In addition, I am an indecisive and fickle lady.  I can NEVER choose favorites and tend toward simple and understated basics to prevent myself from getting sick of something too quickly.  I'd rather leave a space spare and empty than fill it up with a bunch of stuff I know I'll be sick of soon.  But in the past couple years, I've really started to tune in to what I unequivocally like, and I think now it's time that I started incorporating this style into my home.

So now I am challenging myself to WERK and make my home something worth seeing.  Soon I'll share my framework and goals for the project, and as I go I'll share my progress and results.  Now that I am putting this out there, I'll feel the pressure to really turn our home into something I can be proud of.

Check back soon for some new posts about this apartment challenge - my goal is to post something new about the project and its progress every two weeks.